The hardest part of this project was finding some old Tungsten lights and replacing the new low energy bulbs in my office. I have also noticed looking around for examples of Tungsten lighting that it is becoming very much less common. My office is normally lit by 7 small spotlights, a mix of LED's and 7W low voltage bulbs.
Now just 5 minutes after sunset, as I moved my eyes from the scene out side the window to the inside of my room I can see a very definite yellow caste that diminishes as I spend more time looking at the the white walls of my room. Looking back outside the light looks colder and has a slightly blue caste, although this is very much less evident than the yellow caste from the Tungsten lighting. As the light goes down the blue caste is starting to become more prominent.
I have three Tungsten lights in a fitting with 3 spots shining from more or less the center of the room. The lights are 40W each, so a total of 120W in a room of about 10 square meters.
Using a hand held meter with ISO 100 and f/8 I get the following shutter speeds.
Directly under the lights: 1.6s
Middle of the room: 4s
Darkest Corner: 15s
Even taking the meter right up to the light gives a shutter speed of only 1/25, so a very low light level.
With my widest aperture lens, f/1.2 the best speed at ISO 100 would 1/10s. As the lens is a 50mm this is far below the level at which I could hand hold the camera. At higher ISO's I would be able to hand hold and with image stabilization I could do a little better. My widest full frame IS lens is an f/4 24-105mm. It claims to have 3 stops of IS, so the lowest practical shutter speed should be around 1/(24/8) = 1/4s. With a predicted 100 ISO exposure of 4s at f/8, I would need 1s at f/4. In order to hand hold the lens I would need to push the ISO to 400 and would probably go to 800 for security.
Sunday, January 24, 2010
Saturday, January 23, 2010
Photo Shoot: Flowers
One of the hazards of having a photographer in the house is that very square inch of wall space is eventually covered in photographs. Last weekend I decided to create a series of 12 flower images which I printed A4 size and used to create a 3 x 4 matrix of photos in our downstairs bathroom, now designated my gallery. After all it is a place where people have a little time to contemplate!
I set up a pair of 400W studio flashes with softboxes. One I positioned directly behind the subjects to create a bright white background and shine through the flowers. The other flash was about 30 degrees left of my camera position. I set up the flash strength on the rear flash to overexpose the background and completely wash out the white. The other flash I adjusted to get the exposure I wanted. Most of the following images are about 1/2 to 1 stop overexposed as I was looking for a translucent quality in the images. All were shot with a 100mm macro on a Canon EOS 5D Mk II.
Enjoy!!!


Assignment 2: Tutor Response
In this blog entry I wish to respond to my tutors recommendations on Assignment 2 and explore some alternate ideas or images that might have worked better. Rather than consider all 16 images I will just comment on those that did not meet the brief or where improvements have been suggested.
Autumn
In this group my colour accent image was confusing with the leaves on either side of the frame creating confusion.

My original intent had been to create an image with a single leaf, emphasizing the end of Autumn, but, was unable to find a good candidate and time eventually became an issue. The following image was under consideration, but I felt it was too weak, in retrospect I think this would have worked better

Church
The candle image was my proposal for similar colours, my tutor felt that the candles appear more red than orange and thus the relationship is lost

I think this is a marginal call, I understand the point, but feel there is enough red in the image. During the shooting for this set I was trying to focus on detail, so rejected a number of images that could also have worked, but were much larger scale and so did not work so well as a group. The following is also an example of similar colours - it is a chapel below the main alter of Munich Cathedral in which the remains of the bishops of Munich are interred.

In this image all of the colours are shades of yellow through to brown (effectively a dark yellow/orange). I think this is a stronger image than the one i submitted, but did not work as well within the group. Another alternate was the following again emphasizing yellows and browns.

A final image that also would have worked, but was rejected as I wanted a closer focus

Colour accent seems to be my main perceptual problem with this assignment. I was thinking more in terms of % fill in the frame rather than using the colour as a point in the frame to drive motion. The following image would have worked better as a colour contrast

I struggled in the church to find a striking colour accent separated from other similar colours, hence the rather poor choice. Exiting the church and shooting details of the external architecture, I shot the following

The gold sphere acts as an accent, but I felt the image was not terribly interesting at the time, still don't.
Glass
The key issue here as once again colour accent

If there had only been one yellow ball in the frame the accent would have been more pronounced. Once again I was thinking that accent is defined in % of frame terms, rather than acting as a focal point driving movement within the image. Replacing the Green ball at the front of the frame would have created greater focus on the single yellow ball at the back and drawn the eye through the image.
Chemistry
The primary problem with these images was colour management, unfortunately my pallet was very much controlled by the light produced by the light sticks and sometimes, the colour contrasts were not quite as strong as they could have been. I did understand this at the time and new that this was slightly risky, but felt that the unusual nature of the images would make up for this somewhat.
Finally I would like to thank my tutor for her frank and useful feedback, the learning curve is steep but fun!
Monday, January 11, 2010
Project 50
Technically this projects subject is rain, unfortunately it has not rained in Munich for 6 weeks or more and it is quite possible that it will not rain for a further 2 months. Why? It is too cold, the temperature has been below zero now for at least a month and as we look to be in for a tough winter it is quite possible that the temperature will stay below zero for some time to come. In the interests of completing Section 5 on natural light, I am willfully reinterpreting the subject and changing it to snow, of which we have an abundance today. Once the weather picks up I will revisit this project and work up a number of snow themed images.
As we have had snow for some time now I have been taking the opportunity to capture a few images during the fast three weeks. My first image is from the week before Christmas and illustrates the impact of the snow on our postal service. This is the guy we call the Amazon Man with the pre-Christmas delivery trolley, boxes almost towering over his head, struggling through the snow in front of the row of houses I live in. Myself and 3 of my neighbours work in the IT industry and probably now do 90% of our shopping on line. I suspect that whilst the Amazon man was happy to be working, he probably hated us quite badly at this moment in time


As we have had snow for some time now I have been taking the opportunity to capture a few images during the fast three weeks. My first image is from the week before Christmas and illustrates the impact of the snow on our postal service. This is the guy we call the Amazon Man with the pre-Christmas delivery trolley, boxes almost towering over his head, struggling through the snow in front of the row of houses I live in. Myself and 3 of my neighbours work in the IT industry and probably now do 90% of our shopping on line. I suspect that whilst the Amazon man was happy to be working, he probably hated us quite badly at this moment in time

5D2, 24-105mm, 24mm, f/4, 1/30, ISO 100
I have been keen to get some more photos of snow falling, and for the first time in around a week we have had heavy snow today, sadly on my first day back at work, meaning that I could only get out with my camera after dark. The next image is my attempt to capture the swirl of the snow fall in street lighting. The apartment buildings behind add a sense of depth to the image and I very much like the way the snow swirls through the shot following the curl of a wind eddy in the city streets. The colour is not great, I could not find a good white balance and suspect that the light is not putting out a complete spectrum. The image was also challenging as I used a 300mm telephoto with a 1.4x extender to enable me to frame the lamp posts and the buildings as background. A shorter lens would have required me to shoot more upwards losing the sense of depth. The long exposure of 1/10s helped to bring out the streaks of the falling snow reflecting the lamp light, but provided a challenge for hand holding even with IS.

5D2, 300mm + 1.4x, 420mm, f/5.6, 1/10, ISO 3200
The last two images have been the actual fall of the snow, in the next image I have tried to convey a much less obvious sense of the snow, just a few flakes that have stuck to the top of a burr (not sure on the name). This was captured using a macro lens at close to 1:1 reproduction with a shallow DOF to throw out the background. My attention was grabbed by the structure of the burr, it was only later that I realized that the snow added to the image

5D2, 100mm, f/4, 1/180, ISO 800
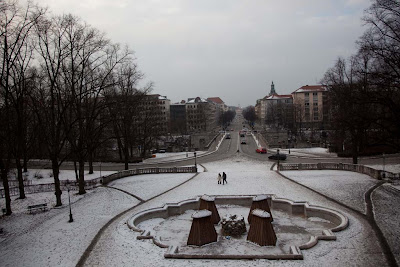
My final choice is designed to show the bleakness of the snow scape, but also to capture some of the fun that snow brings. Two toboggans are being pulled up a slope covered in snow. I have deliberately overexposed this image on capture and in post processing to trun the people into silhouettes, but leaving enough foreground detail to define the slope they are walking up

5D2, 24-105mm, 85mm, f/8, 1/125, ISO 400
Sunday, January 10, 2010
Project 49
As preparation for this exercise I purchased a Cokin grad filter set with 3 filters in x1, x2, and x4 stop strengths. I already had a 77mm circular 2 stop grad filter, that I have used on vacation to darken the very bright tropical skies. The square filters from Cokin have the advantage that the boundary can be adjusted up and down and that they can be combined with other filters. The problem I have is that they vignette on a 24mm lens, my most commonly used wide angle, so in the following images I have cropped slightly.
The photos are taken overlooking one of the main bridges in Munich from the top of a small rise, enabling a broad view of the city and including good foreground detail and a substantial amount of sky.
The first image was taken by simply pointing the camera and hitting the trigger

Now fitting the grad filters at increasing strengths I produced the following 3 images. In each case I have maintained the exposure manually at the same value as the previous image


The middle image with the 2 stop filter preserves the cloud structure best of the images.
The indoor exercise was interesting, I had not considered using a grad filter on its side to darken part of a room. I used my home office to produce the suggested image. I fixed my camera at one end of the room, with the window to the left and took the following image using the cameras metering:


The photos are taken overlooking one of the main bridges in Munich from the top of a small rise, enabling a broad view of the city and including good foreground detail and a substantial amount of sky.
The first image was taken by simply pointing the camera and hitting the trigger

5D2, 24-105mm, 24mm, f/4, 1/1000, ISO 400
This is clearly underexposed as a result of the large portions of the images that are more or less white. Increasing the exposure by one and a half stops produced a better balanced image with white snow, but with the sky nearly completely blown out

5D2, 24-105mm, 24mm, f/4, 1/350, ISO 400
Now fitting the grad filters at increasing strengths I produced the following 3 images. In each case I have maintained the exposure manually at the same value as the previous image


The middle image with the 2 stop filter preserves the cloud structure best of the images.
The indoor exercise was interesting, I had not considered using a grad filter on its side to darken part of a room. I used my home office to produce the suggested image. I fixed my camera at one end of the room, with the window to the left and took the following image using the cameras metering:

5D2, 24-105mm, 24mm, f/8, 20s, ISO 100
I immediately realized that because my room was fairly small I was seeing the opposite affect to the one suggested in the text. The door on the right side of the frame was strongly reflecting the light and was being washed out in the image. I used a hand held meter to check the incident light level across the room. Keeping the aperture and ISO at f/8 and 100 respectively, I measure the following
Left hand wall: 30s
rear book case: 25s
right book case 10s
right hand door: 4s
So the small room was better illuminated opposite the window. To rectify this I tried mounting the grad filter with the dark part to the right of the image. I maintained the exposure as before and captured the following two images with the 1 and 2 stop grad filters


In each case I tried to align the filter edge along the right corner of the room. The 1 stop filter balances the image well, bringing the brightness of the right hand book case down to that of the rear one and preventing the door from being washed out. At 2 stops the door becomes too grey and the right hand book case is now darker than it needs to be.
Project 48
Due to the now continual overcast conditions I was unable to complete pairs of images on the same day, so have used images taken on different days. As a result the framing is a little different, but the subjects are the same and the overall exposure should be be greatly affected by the change in framing.
My first pair is a street scene on the corner of Brahms and Liszt streets (I kid you not), very close to my house. The first image was taken in bright sun a week ago


Finally here are a few photos that take advantage of flat shadowless light (no lack of that at the moment!)


My first pair is a street scene on the corner of Brahms and Liszt streets (I kid you not), very close to my house. The first image was taken in bright sun a week ago

5D2, 24-105mm, 35mm, f/8, 1/180s, ISO 100
A week late on a heavily overcast day (it was snowing slightly):

5D2, 24-105mm, 32mm, f/8, 1/8s, ISO 100
The second exposure is 4.5 stops higher than the sunshine image. The detail in the shaded sections of the image such as the house is better in the overcast image, however, all detail of the tree has been lost as it is now silhouetted against the winter sky without the fill affect of the sun.
My next pair of images are of the iconic HypoVereinsBank headquarters:

5D2, 24-105mm, 102mm, f/5.6, 1/1000, ISO 100

5D2, 24-105mm, 60mm, f/8, 1/60, ISO
The change in exposure is 4 stops, very similar to the earlier pair of images. The first image was taken in fairly low level Sunlight and so the lighting is fairly uniform and not casting huge shadows, in this case the first image contains better contrast and more information about the shape of the object. The second image is very flat and amorphous.
In both cases I have processed with auto white balance, resetting the balance to daylight on the two cloudy images adds a very noticeable blue caste to the images.
Typically for portrait photography I very much prefer not to shoot in direct sunlight as the face castes very noticeable and distracting shadows. In the image in the course work, strong sunlight would have resulted in the mans hat casting a shadow that would have completely obscured any detail in his face. Fill flash can help this, but sometimes creates a very unrealistic looking affect.
I have chosen the following two photo's from my library that would have not been improved by direct sunlight

40D, 50mm, f/2.8, 1/125, ISO 100
Strong sunlight would have overwhelmed the detail of the flowers and lost the softness of this image. I may also have run into problems with a too high shutter speed requiring an ND filter.

5D2, 100mm, f/8, 1/45, ISO 400
This detailed shot of ivy growing around the trunk of a tree would have been diminished by strong light as all detail in the shadows would have been lost.
Finally here are a few photos that take advantage of flat shadowless light (no lack of that at the moment!)

5D2, 24-105mm, 105mm, f/11, 1/45, ISO 800

5D2, 24-105mm, 24mm, f/8, 1/125, ISO 400

5D2, 24-105mm, 28mm, f/8, 1/90, ISO 400

5D2, 100mm, f/5.6, 1/180, ISO 800
Each of these images gains from a lack of strong shadows, enabling the texture and structure of the objects to come through. In the case of the third image, newspaper vending machines, the colour is more striking as the rest of the image is very muted.
In the text book the most striking use of this lighting (to me) is the Flatiron building photographed by Alfred Stieglitz (#38) where the very uniform light provides an almost ghostly look to the building and suggests the coldness of a New York winter. The triptych of images in #28 by Carlton Watkins also use very uniform flat overhead light, softening the landscape and emphasizing the vastness of the scene. The striking portrait, "Migrant Mother" by Dorothea Lange, uses the flat even lighting to bring out the texture of the groups clothing and skin, but also serves to emphasize the bleakness and hopelessness of the situation. Soft even light can be very beautiful and produce fabulous skin tones examples would be any good images of babies, however, it also conveys bleakness and melancholy. I think this is because we associate this lighting with the greyness of winter and transfer that sense of cold to our interpretation of an image.
Wednesday, January 6, 2010
Project 46 & 47
These two projects focus on the quality light just before or just after sunrise and sunset. As these two times are congruent to each other I worked them together. Sunday 3rd January was the first and so far last properly clear day where there was a chance of getting sky conditions consistent with capturing dawn and sunset light. Subsequently I spent almost the whole day in the southern end of the Englischer Garten in the center of Munich, mostly early and late in the day, but just for fun also around lunch as there is a really nice cafe on the edge of the park where Heidi and I headed for lunch.
This area of the park is ideal for photography as it contains a good mixture of formal and open parkland combined with some historical urban architecture, but also with open space and a couple of small hills that offer a good vantage point. Checking the web I determined that the sun would rise at 8am and set at 4:30pm. I would then try and be in the center of the park half an hour before sunrise and then once again around an hour before sunset.
The following commentary is organized chronologically recording the changing light as I saw it. In all cases I have refrained from any form of computer processing other than RAW to JPG conversion for posting, so no exposure compensation, colour management, or sharpening. Almost all images are using my Canon 5D2 SLR, but a couple were captured with my Canon G11 compact. On both cameras I set White Balance to auto. For the low light images, I set the camera to manual and bracketed around what the camera was claiming as "good", review on the screen then helped for finer adjustment. In the brighter sunlit images I took incident light readings using a hand held meter. Almostall photos were taken with the camera mounted on a tripod.
7:20am
After an early Sunday morning start and a 30 minute walk I arrive at the center of the park near a small hill on which sits a small Greek style temple, the Monopteros. My originally goal had been to head west of this structure and use its silhouette as a key element of the Twilight images. The following shot shows what happened when I got there, a bank of cloud sat firmly behind the structure and so whilst there was some light it was very marginal. In the -8C cold I also badly positioned my lens hood, hence the vignette:

5D2, 24-105mm, 24mm, f/4, 1.3s, ISO 800
Fortunately just South the cloud bank ended and I was able to observe the sky brightening behind a tree line. My first image is below

5D2, 24-105mm, 82mm, f/4, 1/2s, ISO 800
I felt that the sky was too light and lacking texture, so I reduced the exposure a little:

5D2, 24-105mm, 82mm, f/4, 1/10s, ISO 800
The first image was +1 eV over the camera the second -1, I much prefer the second image, but could be improved by recomposing to include more of the sky, the bottom 1/3 of the image lacks any detail and is lost - cropping could help.
One of the difficulties I found was deciding how to balance between foreground and sky detail. The following 3 images illustrate this dilemma, each is a stop apart:


5D2, 24-105mm, 32mm, f/4, (1/8s, 1/4s, 1/2s) , ISO 800
In this case I actually prefer the third image 1 stop overexposed as it provides some of the foreground detail of the snow, whilst still yielding some colour in the sky. HDR techniques could provide the best of both worlds here, however, I am yet to decide whether I like this technique as images can look very false.
7:40am
As the sky brightened I realized that the tree line would offer a very limited variety of options, so I decided to move on towards a pond nearby and try to get an image with reflection

5D2, 24-105mm, 50mm, f/4, 0.6s, ISO 200
The light was strengthening and with the extra light from the reflection I was able to reduce the exposure significantly by shifting from ISO 800 to ISO 200. The building to the right of the image is the famous (or infamous) Haus der Kunst art gallery commissioned by Adolf Hitler in the 1930's and is floodlit so the light is not yet coming from the rising Sun.
A couple of 100m away the central justice court at the Eastern end of the Hof Garten (a formal garden, part of the royal palace of the former kings of Bavaria, and a favorite spot for photography) provided the next opportunity to image the dawn against an interesting sky line.

5D2, 24-105mm, 32mm, f/4, 1/5s, ISO 200
Looking west the light was starting to illuminate some of the nearby buildings - although the church in the background is floodlit at night so the image is a little false.

5D2, 24-105mm, 50mm, f/8, 1s, ISO 100
For this image I was able to drop the ISO to 100, but increased the depth of field by changing aperture to f/8 so keep the whole frame in focus. Using a tripod I could have maintained a low ISO for some of the darker shots, however, the 20-30s shutter speeds slow me down and in this cold I was not too keen to hang around. Looking east once again the sky was starting to develop some colour. Using the longer telephoto end of the lens at 105mm enabled me to fill the frame:

5D2, 24-105mm, 50mm, f/8, 1/10s, ISO 100
8:15am
The Sun had now risen above the horizon, although within the city landscape it would still be some time before it appeared on the horizon. On the other hand the sky was starting to light up behind the court building generating an almost fiery atmosphere. The following two images are close ups of the dome of the building using some tree branches to frame the dome and add interest to the image. The first image is -2 stops, the second is +1 stop.

5D2, 24-105mm, 55mm, f/4, 1/180s, ISO 100

5D2, 24-105mm, 55mm, f/4, 1/20s, ISO 100
This pair of images illustrates the choice at this time of either exposing for the building or for the sky, however, the following image shows that it is possible to combine some building detail with a dramatic sky, although this is becuase the building roof is curved and thus able to reflect more light from the sky towards the camera:

5D2, 24-105mm, 105mm, f/6.7, 1/45s, ISO 100
Turning west once again the light was now starting to clip the upper stories of the buildings and clearly daylight was beginning:

5D2, 24-105mm, 75mm, f/4, 1/20s, ISO 100

5D2, 24-105mm, 105mm, f/8, 1/6s, ISO 100
As the twilight was now receding and I was not well positioned to do much more with the early morning light, plus I was slowly freezing to the spot, I decided to head home and grab some breakfast.
12:30pm
Simply heading out for a walk to get lunch in the city we walked through the park and I grabbed the following two images as we passed by the site of my earlier photos.

G11, 6mm, f/4, 1/2500s, ISO 80
This image shows how low in the sky the sun is at this time of year, even close to midday, essentially all photography at this time of year is with a low Sun. The second image is a close up of the monopteros, which I will be using later as the structure for the sequence of images created for project 46: choosing the moment.

G11, 30mm, f/4.5, 1/800s, ISO 80
3:45pm
Back at the Monopteros once again, about 45 minutes before sunset! The following sequence of images was captured between 3:45pm and 4:20pm, about half an hour and are designed to show how the lighting changed as the Sun gradually got lower in the sky. I tripod mounted my camera on on a small rise adjacent to the subject matter. The biggest challenge was to find a location in which my shadow was not included in the image and where I could avoid the camera being obscured by people gathering at what is a popular spot for sledging in the park. I have framed the sequence of pictures to include the Monopteros as a focal point in the top right, but also to include trees on the left and a path along which people were enjoying an evening stroll. I tried to maintain the same framing, but had to adjust a couple of times when people got in the way.
My first image was taken with the camera in aperture priority and with no exposure compensation

5D2, 24-105mm, 32mm, f/13, 1/125s, ISO 100
My first mistake, there was no way my camera would be able to accurately meter a scene with snow on the ground and a bright sky. using my handheld meter I made an incident light reading and made the following exposure:

5D2, 24-105mm, 28mm, f/8, 1/125s, ISO 100
At this stage most of the frame is sunlit, the shadows caste by the people show how low the sun is. 5 minutes later the scene is still fairly well lit, but the shadows are starting to lengthen and the shadow in front of my position is growing

5D2, 24-105mm, 28mm, f/8, 1/125s, ISO 100
Another 7 minutes later and the shadows are really lengthening, but otherwise the scene remains more or less the same - the exposure is slightly longer

5D2, 24-105mm, 32mm, f/8, 1/100s, ISO 100
Stepping forward another 7 minutes the scene has changed significantly with the shadow starting to approach the hill and the light level on the hill falling, softening the image and reducing the contrast. The exposure has increased by over a stop:

5D2, 24-105mm, 32mm, f/8, 1/40s, ISO 100
Stepping forward another 7 minutes to 4:15pm the whole hill is now in shadow, with the exception of the Monopteros, making the building very much the focus of the image, strongly glowing in the falling light. The sky is also losing its contrast with the ground. The exposure is now +2 stops compared to the previous image

5D2, 24-105mm, 32mm, f/13, 1/15s, ISO 100
A few minutes later the Sun had gone and all was back to a bleak snowy landscape, very similar to that in the first image in this post. Time to go
In this sequence the 4th image with the two people in the foreground works best for me. The sun is low enough to caste very long shadows, but still illuminate the snowy foreground. Combined with the yellow of the building this scene is very reminiscent of a Munich winter.
4:25pm
I turned my attention once more to Twilight and the potential for images created by the light behind the Munich skyline as seen from the park. I switched to a 300mm telephoto and took the following image

5D2, 300mm, f/4, 1/2500s, ISO 100
Whilst I liked the landscape view I wanted to include the light reflected in the clouds above the horizon and so switched to a portrait shot choosing an exposure that would provide a black foreground but colour in the clouds:

5D2, 300mm, f/8, 1/200s, ISO 100
I went back to wide angle and captured a landscape silhouette:

5D2, 24-105mm, 28mm, f/8, 1/60s, ISO 100
My final image is just before heading to the underground towards home at 5:07pm, when night had all but fallen

5D2, 24-105mm, 24mm, f/8, 6s, ISO 100
The sky still had enough light to bring out the cloud structure which balanced well with the artificial illumination of the church, but at the price of a 6s exposure.
reflecting on the day, this was a very rewarding experience, the rapidly changing twilight was really quite exciting, selection of scene had to be made quickly and exposure chosen carefully with bracketing. The use of a near normal focal length around 50mm provided the best combination of foreground detail and background lighting. Wide angle shots were interesting, but included too much sky, perhaps at a different time of year with a different combination of clouds the wider angle would work. The very long 300mm telephoto did not capture enough variety of colour in the sky, but the silhouettes it produced were the best of the group of photos.
My final observation is that the sequence capturing the moment, during sunset were not different enough, I suspect this is because the Sun was already low in the sky even at midday and so the lighting angle is not changing very much during the day.
Subscribe to:
Posts (Atom)
